魔改教程总结(二)
前言📇
- 本文参考博客魔改教程总结(一)、博客魔改教程总结(二)、Iconfont Inject、糖果屋微调合集
- 本系列基本上都是各位大佬造好的轮子,具体参考 Fomalhaut大佬。其目的在于防止各位大佬的链接失效,且个人复习总结使用,如有侵权请联系删除。
- 本系列起始空白的虚拟机,一步一步搭建魔改页面,使用本地端口。若想部署在其它平台,可自寻查找。
- 鉴于每个人的根目录名称都不一样,本帖博客根目录一律以
[BlogRoot]指代。- 本帖涉及魔改源码的内容,会使用diff代码块标识,复制时请不要忘记删除前面的
+、-符号。- 因为
.pug和.styl以及.yml等对缩进要求较为严格,请尽量不要使用记事本等无法提供语法高亮的文本编辑器进行修改。- 本系列基于
Butterfly主题进行魔改方案编写,hexo 版本6.3.0,Butterfly 版本4.12.0。- 魔改会过程常常引入自定义的css与js文件,具体方法见方法见Hexo博客添加自定义css和js文件
博客搭建与魔改系列教程导航🚥🚥🚥
- 🎀hexo基础搭建教程(一)
- 🎆hexo基础搭建教程(二)
- 🎇魔改教程总结(一)
- 🧨魔改教程总结(二)⬅当前位置🛸
- ✨魔改教程总结(三)
外挂标签的引入(店长)
点击查看教程
安装插件,在博客根目录
[BlogRoot]下打开终端,运行以下指令:1
npm install hexo-butterfly-tag-plugins-plus --save
考虑到hexo自带的markdown渲染插件
hexo-renderer-marked与外挂标签语法的兼容性较差,建议您将其替换成hexo-renderer-kramed1
2npm uninstall hexo-renderer-marked --save
npm install hexo-renderer-kramed --save添加配置信息,以下为写法示例
在站点配置文件_config.yml或者主题配置文件_config.butterfly.yml中添加1
2
3
4
5
6
7
8
9
10
11
12
13
14
15# tag-plugins-plus
# see https://akilar.top/posts/615e2dec/
tag_plugins:
enable: true # 开关
priority: 5 #过滤器优先权
issues: false #issues标签依赖注入开关
link:
placeholder: /img/link.png #link_card标签默认的图标图片
CDN:
anima: https://npm.elemecdn.com/hexo-butterfly-tag-plugins-plus@latest/lib/assets/font-awesome-animation.min.css #动画标签anima的依赖
jquery: https://npm.elemecdn.com/jquery@latest/dist/jquery.min.js #issues标签依赖
issues: https://npm.elemecdn.com/hexo-butterfly-tag-plugins-plus@latest/lib/assets/issues.js #issues标签依赖
iconfont: //at.alicdn.com/t/c/fonxxxx.js #参看https://akilar.top/posts/d2ebecef/
carousel: https://npm.elemecdn.com/hexo-butterfly-tag-plugins-plus@latest/lib/assets/carousel-touch.js
tag_plugins_css: https://npm.elemecdn.com/hexo-butterfly-tag-plugins-plus@latest/lib/tag_plugins.css参数释义
| 参数 | 备选值/类型 | 释义 |
|---|---|---|
| enable | true/false | 【必选】控制开关 |
| priority | number | 【可选】过滤器优先级,数值越小,执行越早,默认为10,选填 |
| issues | true/false | 【可选】issues标签控制开关,默认为false |
| link.placeholder | 【必选】link卡片外挂标签的默认图标 | |
| CDN.anima | URL | 【可选】动画标签anima的依赖 |
| CDN.jquery | URL | 【可选】issues标签依赖 |
| CDN.issues | URL | 【可选】issues标签依赖 |
| CDN.iconfont | URL | 【可选】iconfont标签symbol样式引入,如果不想引入,则设为false |
| CDN.carousel | URL | 【可选】carousel旋转相册标签鼠标拖动依赖,如果不想引入则设为false |
| CDN.tag_plugins_css | URL | 【可选】外挂标签样式的CSS依赖,为避免CDN缓存延迟,建议将@latest改为具体版本号 |
具体样式和写法可见:Markdown语法与外挂标签写法汇总
文章三栏(店长+微调)
点击查看教程
- 需要前置:页面样式调节
参考:双栏布局首页卡片魔改教程
本网站采用的是三栏+响应式布局的方案,也就是slidecard的方案,但是为了可拓展性,我还是把两种都搬了过来,方便大家阅读!
修改
[BlogRoot]\themes\butterfly\layout\includes\mixins\post-ui.pug,整个替换为下面的代码,注意,我这里用的是彩色的图标,每个//- i.fas那里表示我注释了黑白的额图标并换上彩色图标,彩色图标引入的具体方法见之前的教程,这里只需要替换成你自己的图标名字和调节相应的大小即可:1
2
3
4
5
6
7
8
9
10
11
12
13
14
15
16
17
18
19
20
21
22
23
24
25
26
27
28
29
30
31
32
33
34
35
36
37
38
39
40
41
42
43
44
45
46
47
48
49
50
51
52
53
54
55
56
57
58
59
60
61
62
63
64
65
66
67
68
69
70
71
72
73
74
75
76
77
78
79
80
81
82
83
84
85
86
87
88
89
90
91
92
93
94
95
96
97
98
99
100
101
102
103
104
105
106
107
108
109
110
111
112
113
114
115
116
117
118
119
120
121
122
123
124
125
126
127
128
129
130
131
132
133
134
135
136
137
138
139
140
141
142
143
144
145
146
147//- 首页三栏卡片
mixin postUI(posts)
each article , index in page.posts.data
.recent-post-item
-
let link = article.link || article.path
let title = article.title || _p('no_title')
const position = theme.cover.position
let leftOrRight = position === 'both'
? index%2 == 0 ? 'left' : 'right'
: position === 'left' ? 'left' : 'right'
let post_cover = article.cover
let no_cover = article.cover === false || !theme.cover.index_enable ? 'no-cover' : ''
-
.recent-post-content(class=leftOrRight)
.recent-post-cover
img.article-cover(src=url_for(post_cover) onerror=`this.onerror=null;this.src='`+ url_for(theme.error_img.post_page) + `'` alt=title)
.recent-post-info
a.article-title(href=url_for(link) title=title)
.article-title-link= title
.recent-post-meta
.article-meta-wrap
if (is_home() && (article.top || article.sticky > 0))
span.article-meta
//- i.fas.fa-thumbtack.sticky
svg.meta_icon(style="width:16px;height:16px;position:relative;top:3px").post-ui-icon
use(xlink:href='#icon-tuding')
span.sticky= _p('sticky')
span.article-meta-separator |
if (theme.post_meta.page.date_type)
span.post-meta-date
if (theme.post_meta.page.date_type === 'both')
//- i.far.fa-calendar-alt
svg.meta_icon(style="width:21px;height:21px;position:relative;top:6px").post-ui-icon
use(xlink:href='#icon-rili')
span.article-meta-label=_p('post.created')
time.post-meta-date-created(datetime=date_xml(article.date) title=_p('post.created') + ' ' + full_date(article.date))=date(article.date, config.date_format)
span.article-meta-separator |
//- i.fas.fa-history
svg.meta_icon(style="width:13px;height:13px;position:relative;top:2px").post-ui-icon
use(xlink:href='#icon-gengxin_')
span.article-meta-label=_p('post.updated') + " "
time.post-meta-date-updated(datetime=date_xml(article.updated) title=_p('post.updated') + ' ' + full_date(article.updated))=date(article.updated, config.date_format)
else
- let data_type_updated = theme.post_meta.page.date_type === 'updated'
- let date_type = data_type_updated ? 'updated' : 'date'
- let date_icon = data_type_updated ? 'fas fa-history' :'far fa-calendar-alt'
- let date_title = data_type_updated ? _p('post.updated') : _p('post.created')
i(class=date_icon)
span.article-meta-label=date_title
time(datetime=date_xml(article[date_type]) title=date_title + ' ' + full_date(article[date_type]))=date(article[date_type], config.date_format)
if (theme.post_meta.page.categories && article.categories.data.length > 0)
span.article-meta
span.article-meta-separator |
//- i.fas.fa-inbox
svg.meta_icon(style="width:12px;height:12px;position:relative;top:1px").post-ui-icon
use(xlink:href='#icon-fenlei4-copy')
each item, index in article.categories.data
a(href=url_for(item.path)).article-meta__categories #[=item.name]
if (index < article.categories.data.length - 1)
i.fas.fa-angle-right.article-meta-link
if (theme.post_meta.page.tags && article.tags.data.length > 0)
span.article-meta.tags
span.article-meta-separator |
//- i.fas.fa-tag
svg.meta_icon(style="width:13px;height:13px;position:relative;top:2px").post-ui-icon
use(xlink:href='#icon-biaoqian')
each item, index in article.tags.data
a(href=url_for(item.path)).article-meta__tags #[=item.name]
if (index < article.tags.data.length - 1)
span.article-meta-link #[=' • ']
mixin countBlockInIndex
- needLoadCountJs = true
span.article-meta
span.article-meta-separator |
//- i.fas.fa-comments
svg.meta_icon(style="width:13px;height:13px;position:relative;top:2px").post-ui-icon
use(xlink:href='#icon-pinglun')
if block
block
span.article-meta-label= ' ' + _p('card_post_count')
if theme.comments.card_post_count
case theme.comments.use[0]
when 'Disqus'
+countBlockInIndex
a(href=full_url_for(link) + '#disqus_thread')
i.fa-solid.fa-spinner.fa-spin
when 'Disqusjs'
+countBlockInIndex
a(href=full_url_for(link) + '#disqusjs')
span.disqus-comment-count(data-disqus-url=full_url_for(link))
i.fa-solid.fa-spinner.fa-spin
when 'Valine'
+countBlockInIndex
a(href=url_for(link) + '#post-comment')
span.valine-comment-count(data-xid=url_for(link))
i.fa-solid.fa-spinner.fa-spin
when 'Waline'
+countBlockInIndex
a(href=url_for(link) + '#post-comment')
span.waline-comment-count(id=url_for(link))
i.fa-solid.fa-spinner.fa-spin
when 'Twikoo'
+countBlockInIndex
a.twikoo-count(href=url_for(link) + '#post-comment')
i.fa-solid.fa-spinner.fa-spin
when 'Facebook Comments'
+countBlockInIndex
a(href=url_for(link) + '#post-comment')
span.fb-comments-count(data-href=urlNoIndex(article.permalink))
when 'Remark42'
+countBlockInIndex
a(href=url_for(link) + '#post-comment')
span.remark42__counter(data-url=urlNoIndex(article.permalink))
i.fa-solid.fa-spinner.fa-spin
when 'Artalk'
+countBlockInIndex
a(href=url_for(link) + '#post-comment')
span.artalk-count(data-page-key=url_for(link))
i.fa-solid.fa-spinner.fa-spin
a.article-content(href=url_for(link) title=title)
//- Display the article introduction on homepage
case theme.index_post_content.method
when false
- break
when 1
.article-content-text!= article.description
when 2
if article.description
.article-content-text!= article.description
else
- const content = strip_html(article.content)
- let expert = content.substring(0, theme.index_post_content.length)
- content.length > theme.index_post_content.length ? expert += ' ...' : ''
.article-content-text!= expert
default
- const content = strip_html(article.content)
- let expert = content.substring(0, theme.index_post_content.length)
- content.length > theme.index_post_content.length ? expert += ' ...' : ''
.article-content-text!= expert
.recent-post-arrow
if theme.ad && theme.ad.index
if (index + 1) % 3 == 0
.recent-post-item.ads-wrap!=theme.ad.index样式方案提供两种:
- 样式一:电脑端宽屏采用滑动卡片,平板宽度采用双栏布局,手机宽度采用单栏卡片
- 样式二:移除滑动卡片,按屏幕宽度依次应用三栏、双栏、单栏
新建目录
[BlogRoot]\themes\butterfly\source\css\_index_card_style\,并在下面新建对应的文件slidecard.styl和multicard.styl并分别填入以下内容,第一个滑动卡片的是店长原版的,我微调一下第二个的样式,大家可以根据自己的选择进行修改:1
2
3
4
5
6
7
8
9
10
11
12
13
14
15
16
17
18
19
20
21
22
23
24
25
26
27
28
29
30
31
32
33
34
35
36
37
38
39
40
41
42
43
44
45
46
47
48
49
50
51
52
53
54
55
56
57
58
59
60
61
62
63
64
65
66
67
68
69
70
71
72
73
74
75
76
77
78
79
80
81
82
83
84
85
86
87
88
89
90
91
92
93
94
95
96
97
98
99
100
101
102
103
104
105
106
107
108
109
110
111
112
113
114
115
116
117
118
119
120
121
122
123
124
125
126
127
128
129
130
131
132
133
134
135
136
137
138
139
140
141
142
143
144
145
146
147
148
149
150
151
152
153
154
155
156
157
158
159
160
161
162
163
164
165
166
167
168
169
170
171
172
173
174
175
176
177
178
179
180
181
182
183
184
185
186
187
188
189
190
191
192
193
194
195
196
197
198
199
200
201
202
203
204
205
206
207
208
209
210
211
212
213
214
215
216
217
218
219
220
221
222
223
224
225
226
227
228
229
230
231
232
233
234
235
236
237
238
239
240
241
242
243
244
245
246
247
248
249
250
251
252
253
254
255
256
257
258
259
260
261
262
263
264
265
266
267
268
269
270
271
272
273
274//default color:
:root
--recent-post-bgcolor: rgba(255, 255, 255, 0.9) //默认背景
--article-content-bgcolor: #49b1f5 //描述版块背景
--recent-post-arrow: #ffffff //箭头配色
--recent-post-cover-shadow: #ffffff //封面遮罩层配色,建议和默认值的颜色相对应。
--recent-post-transition: all 0.5s cubic-bezier(0.59, 0.01, 0.48, 1.17) //动画效果。不了解的不要改动
[data-theme="dark"]
--recent-post-bgcolor: rgba(35,35,35,0.5)
--article-content-bgcolor: #99999a
--recent-post-arrow: #37e2dd
--recent-post-cover-shadow: #232323
// 默认的首页卡片容器布局
.recent-posts
padding 0 15px 0 15px
height fit-content
.recent-post-item
margin-bottom 15px
width 100%
background var(--recent-post-bgcolor)
overflow hidden
border-radius 15px
.recent-post-content
display flex
background var(--recent-post-bgcolor)
position relative
.recent-post-cover
display flex
background transparent
.recent-post-info
display flex
background transparent
flex-direction column
justify-content center
align-items center
.article-title
height 50%
display: flex
text-align: center
align-items: center
justify-content: flex-end
flex-direction: column
.article-title-link
color: var(--text-highlight-color)
transition: all .2s ease-in-out
display: -webkit-box;
-webkit-box-orient: vertical;
overflow: hidden;
&:hover
color: $text-hover
.recent-post-meta
height 50%
display: flex
text-align: center
align-items: center
justify-content: flex-start
flex-direction: column
.article-meta-wrap
color #969797
display: -webkit-box;
-webkit-box-orient: vertical;
overflow: hidden;
a
color: var(--text-highlight-color)
transition: all .2s ease-in-out
color #969797
&:hover
color: $text-hover
.article-content
display flex
text-align: center
flex-direction row
align-items center
justify-content center
.article-content-text
display -webkit-box
-webkit-box-orient vertical
text-overflow: ellipsis
overflow hidden
color #fff
text-shadow 1px 2px 3px #000
&::before
content "❝"
font-size 20px
&::after
content "❞"
font-size 20px
&.ads-wrap
display: block
height: auto
// PC端滑动卡片样式
@media screen and (min-width:1069px)
.recent-posts
padding 0 15px 0 15px
.recent-post-item
.recent-post-content
position relative
height 200px
width 100%
transition var(--recent-post-transition)
&:hover
.recent-post-cover-shadow
width 10.1%
transition var(--recent-post-transition)
.recent-post-cover
width 10%
transition var(--recent-post-transition)
.article-content
width calc(30% + 80px)
transition var(--recent-post-transition)
.article-content-text
opacity 1
.recent-post-arrow
transition var(--recent-post-transition)
.recent-post-cover-shadow
z-index: 1
transition var(--recent-post-transition)
position: absolute
height 200px
width 40%
.recent-post-cover
height 200px
width 40%
transition var(--recent-post-transition)
img
height 100%
width 100%
object-fit cover
.recent-post-info
height 200px
width calc(60% - 80px)
.article-title
margin: 0px 40px
font-size 24px
.article-title-link
-webkit-line-clamp: 2;
.recent-post-meta
margin: 0px 20px
.article-meta-wrap
font-size 12px
-webkit-line-clamp: 3;
.article-content
height 200px
width 90px
background var(--article-content-bgcolor)
transition var(--recent-post-transition)
.article-content-text
-webkit-line-clamp 4
transition: var(--recent-post-transition)
opacity 0
.recent-post-arrow
transition var(--recent-post-transition)
display block
position absolute
height 20px
width 8px
background var(--recent-post-arrow)
&.both,
&.right
.recent-post-cover-shadow
left 0
background linear-gradient(to left, var(--recent-post-cover-shadow), transparent)
.recent-post-cover
order: 1
.recent-post-info
order: 2
.article-content
order: 3
clip-path polygon(0 50%, 80px 0, 100% 0, 100% 100%, 80px 100%)
.article-content-text
margin 20px 40px 20px 80px
.recent-post-arrow
order: 4
left calc(100% - 80px)
top calc(50% - 10px)
clip-path polygon(0 10px, 8px 0, 8px 20px)
&:hover
.recent-post-arrow
left calc(100% - 40px)
&.left
.recent-post-cover-shadow
right 0
background linear-gradient(to right, var(--recent-post-cover-shadow), transparent)
.recent-post-cover
order: 4
.recent-post-info
order: 3
.article-content
order: 2
clip-path polygon(100% 50%,calc(100% - 80px) 100%,0 100%,0 0,calc(100% - 80px) 0)
.article-content-text
margin 20px 80px 20px 40px
.recent-post-arrow
order: 1
left 72px
top calc(50% - 10px)
clip-path polygon(0 0, 8px 10px, 0 20px)
&:hover
.recent-post-arrow
left 32px
// 双栏布局卡片自适应适配
@media screen and (min-width:572px) and (max-width:1068px)
.recent-posts
padding 0 15px 0 15px
display flex
flex-direction row
flex-wrap wrap
.recent-post-item
border-radius 15px
overflow hidden
width 47%
margin 0px 3% 20px 0px
nav#pagination
width: 100%
// 手机端单栏布局自适应适配
@media screen and (max-width:572px)
.recent-posts
padding 0 15px 0 15px
.recent-post-item
border-radius 15px
overflow hidden
// 手机端及双栏卡片样式
@media screen and (max-width:1068px)
.recent-posts
.recent-post-item
.recent-post-content
flex-direction column
flex-wrap nowrap
align-items center
max-height 350px
height: auto
width 100%
.recent-post-cover
width 100%
height 200px
clip-path polygon(0 130px,0 0,100% 0,100% 130px,50% 100%)
img
height 200px
width 100%
object-fit cover
.recent-post-info
height 150px
width 100%
padding 0px 25px 5px 25px
.article-title
margin: 0px 40px
font-size 18px
.article-title-link
-webkit-line-clamp: 2;
.recent-post-meta
margin: 0px 20px
.article-meta-wrap
font-size 12px
-webkit-line-clamp: 3;
.article-content
position absolute
height 200px
width 100%
background rgba(25,25,25,0.5)
clip-path polygon(0 130px,0 0,100% 0,100% 130px,50% 100%)
.article-content-text
-webkit-line-clamp 3
font-size 16px
margin 0px 25px 30px 25px
.recent-post-arrow
display block
background var(--article-content-bgcolor)
position absolute
height 10px
width 20px
clip-path polygon(0 0,100% 0,50% 100%)
top 20px1
2
3
4
5
6
7
8
9
10
11
12
13
14
15
16
17
18
19
20
21
22
23
24
25
26
27
28
29
30
31
32
33
34
35
36
37
38
39
40
41
42
43
44
45
46
47
48
49
50
51
52
53
54
55
56
57
58
59
60
61
62
63
64
65
66
67
68
69
70
71
72
73
74
75
76
77
78
79
80
81
82
83
84
85
86
87
88
89
90
91
92
93
94
95
96
97
98
99
100
101
102
103
104
105
106
107
108
109
110
111
112
113
114
115
116
117
118
119
120
121
122
123
124
125
126
127
128
129
130
131
132
133
134
135
136
137
138
139
140
141
142
143
144
145
146
147
148
149
150
151
152
153
154
155
156
157
158
159
160
161
162
163
164
165
166
167
168
169
170
171
172
173
174:root
--theme-color:rgb(57, 197, 187)
--text-bg-hover:rgba(57, 197, 187, 0.7)
.recent-posts
padding 0 5px 0 5px
height fit-content
.recent-post-item
margin-bottom 15px
overflow hidden
border-radius 15px
.recent-post-content
display flex
position relative
&:hover
.recent-post-cover
img
transition: all .6s ease-in-out
scale: 1.08
.article-content
.article-content-text
transition: all .6s ease-in-out
scale: 1.08
.recent-post-cover
display flex
background transparent
.recent-post-info
display flex
background transparent
flex-direction column
justify-content center
align-items center
.article-title
height 50%
display: flex
text-align: center
align-items: center
justify-content: flex-end
flex-direction: column
.article-title-link
color: var(--text-highlight-color)
transition: all .2s ease-in-out
display: -webkit-box;
-webkit-box-orient: vertical;
overflow: hidden;
&:hover
color: var(--theme-color)
.recent-post-meta
height 50%
display: flex
text-align: center
align-items: center
justify-content: flex-start
flex-direction: column
.article-meta-wrap
color #969797
display: -webkit-box;
-webkit-box-orient: vertical;
overflow: hidden;
a
color: var(--text-highlight-color)
transition: all .2s ease-in-out
color #969797
&:hover
color: var(--theme-color)
.article-content
display flex
text-align: center
flex-direction row
align-items center
justify-content center
.article-content-text
display -webkit-box
-webkit-box-orient vertical
text-overflow: ellipsis
overflow hidden
color #fff
text-shadow 1px 2px 3px #000
// transition transform 0.6s;
// &:hover
// transform: scale(1.1);
&.ads-wrap
display: block
height: auto
nav#pagination
width: 100%
// 卡片单元布局样式
.recent-posts
padding 0 5px 0 5px
display flex
flex-direction row
flex-wrap wrap
.recent-post-item
border-radius 15px
overflow hidden
.recent-post-content
flex-direction column
flex-wrap nowrap
align-items center
max-height 350px
height: auto
width 100%
.recent-post-cover
width 100%
height 200px
clip-path polygon(0 130px,0 0,100% 0,100% 130px,50% 100%)
img
height 200px
width 100%
object-fit cover
.recent-post-info
height 145px
width 100%
padding 0px 25px 5px 25px
.article-title
margin: 0px 40px
font-size 19px
.article-title-link
-webkit-line-clamp: 2;
.recent-post-meta
margin: 0px 20px
.article-meta-wrap
font-size 13px
-webkit-line-clamp: 3;
.article-content
position absolute
height 200px
width 100%
background rgba(25,25,25,0.4)
clip-path polygon(0 130px,0 0,100% 0,100% 130px,50% 100%)
.article-content-text
-webkit-line-clamp 3
font-size 16px
margin 0px 25px 30px 25px
&::before
content "「"
font-size 20px
&::after
content "」"
font-size 20px
.recent-post-arrow
display block
background var(--text-bg-hover)
position absolute
height 10px
width 20px
clip-path polygon(0 0,100% 0,50% 100%)
// 三栏布局滑动卡片样式
@media screen and (min-width:1069px)
.recent-posts
.recent-post-item
width 32.3%
margin 0px 1% 20px 0px
.recent-post-content
.recent-post-info
.article-title
margin: 0px 5px
.article-title-link
-webkit-line-clamp: 1;
.recent-post-meta
margin: 0px 5px
.article-meta-wrap
-webkit-line-clamp: 2;
// 双栏布局卡片自适应适配
@media screen and (min-width:572px) and (max-width:1068px)
.recent-posts
.recent-post-item
width 47%
margin 0px 3% 20px 0px
// 单栏布局卡片自适应适配
@media screen and (max-width:572px)
.recent-posts
.recent-post-item
width 100%修改
[BlogRoot]\themes\butterfly\source\css\_page\homepage.styl,将整文件内容替换为以下代码:1
2
3
4if hexo-config('index_card_style') == 'slidecard'
@import './_index_card_style/slidecard'
else if hexo-config('index_card_style') == 'multicard'
@import './_index_card_style/multicard'然后在主题配置文件
[BlogRoot]\_config.butterfly.yml里新增配置项,这样我们就可以通过配置项自由切换使用哪款了:1
2
3# 主页卡片样式
# Docs: https://akilar.top/posts/d6b69c49/
index_card_style: multicard # slidecard | multicard考虑到不管是样式一还是样式二都存在一个布局突变的情况。为了不至于让首页的文章出现空缺,建议将首页生成的文章数量控制为1,2,3的公倍数。修改站点配置文件
[BlogRoot]\_config.yml。找到以下配置项进行调整,注意这是站点配置文件本就有的配置项,不是新增配置项。建议是调整为12篇。如果你的侧边栏魔改内容特别多,那么建议改成18、24、30。务必确保文章卡片栏比侧栏完全展开要长,这样展示效果最好1
2
3
4
5
6
7
8# Home page setting
# path: Root path for your blogs index page. (default = '')
# per_page: Posts displayed per page. (0 = disable pagination)
# order_by: Posts order. (Order by date descending by default)
index_generator:
path: ''
per_page: 12
order_by: -date本教程讨论的卡片都是考虑有封面和有描述的。所以需要保证你已经开启了相应的配置,查看主题配置文件
[BlogRoot]\_config.butterfly.yml,找到配置项开启描述栏,建议选择2模式1
2
3
4
5
6
7
8# Display the article introduction on homepage
# 1: description
# 2: both (if the description exists, it will show description, or show the auto_excerpt)
# 3: auto_excerpt (default)
# false: do not show the article introduction
index_post_content:
method: 2
length: 500 # if you set method to 2 or 3, the length need to config在
_config.butterfly.yml中开启首页文章信息1
2
3
4
5
6
7
8
9
10
11
12
13post_meta:
page: # Home Page
date_type: both # created or updated or both 主頁文章日期是創建日或者更新日或都顯示
date_format: date # date/relative 顯示日期還是相對日期
categories: true # true or false 主頁是否顯示分類
tags: true # true or false 主頁是否顯示標籤
label: true # true or false 顯示描述性文字
post:
date_type: both # created or updated or both 文章頁日期是創建日或者更新日或都顯示
date_format: date # date/relative 顯示日期還是相對日期
categories: true # true or false 文章頁是否顯示分類
tags: true # true or false 文章頁是否顯示標籤
label: true # true or false 顯示描述性文字
Social卡片彩色图标引入(店长)
点击查看教程
这里需要前置:阿里的 iconfont 引入
重写
[BlogRoot]\themes\butterfly\layout\includes\header\social.pug,替换为以下代码:1
2
3
4
5
6
7
8
9
10each value, title in theme.social
a.social-icon.faa-parent.animated-hover(href=url_for(trim(value.split('||')[0])) target="_blank" title=title === undefined ? '' : trim(title))
if value.split('||')[1]
- var icon_value = trim(value.split('||')[1])
- var anima_value = value.split('||')[2] ? trim(value.split('||')[2]) : 'faa-tada'
if icon_value.substring(0,2)=="fa"
i.fa-fw(class=icon_value + ' ' + anima_value)
else if icon_value.substring(0,4)=="icon"
svg.icon(aria-hidden="true" class=anima_value)
use(xlink:href=`#`+ icon_value)以下为对应的
social配置项。写法沿用menu_item的写法示例,修改[BlogRoot]\_config.butterfly.yml的social配置项,具体的链接改为自己的。1
2
3
4
5
6# Social Settings (社交圖標設置)
# formal:
# icon: link || the description || color
social:
icon-github: https://github.com/redbeancc || icon-github || faa-tada
icon-youjian: mailto:2074077441@qq.com || icon-youjian || faa-tada要注意的是,这里的动态图标是
svg.icon的标签,因此上面调节.iconfont的css并不使用,我们需要在自定义样式文件custom.css里加上一些样式来限制图标的大小和颜色等,具体大小自行调节(如果上面弄过菜单栏的图标大小,这里也就不需要再重复写了)。1
2
3
4
5
6
7svg.icon {
width: 1.28em;
height: 1.28em;
vertical-align: -0.15em;
fill: currentColor;
overflow: hidden;
}进阶操作:不知道大家发现没有,这个css对菜单栏的图标和对社交图标同时生效,但是有时候我们想这两者有不一样的大小,怎么办?其实很简单,只要我们给这两部分的图标元素贴上不同的“标签”就可以,这个标签可以是
id,也可以是class,但是众所周知html中的id是唯一的,我们这里有多个图标,因此贴上不通的class比较合适,因此我们改造一下[BlogRoot]\themes\butterfly\layout\includes\header\social.pug这个文件1
2
3
4
5
6
7
8
9
10
11each value, title in theme.social
a.social-icon.faa-parent.animated-hover(href=url_for(trim(value.split('||')[0])) target="_blank" title=title === undefined ? '' : trim(title))
if value.split('||')[1]
- var icon_value = trim(value.split('||')[1])
- var anima_value = value.split('||')[2] ? trim(value.split('||')[2]) : 'faa-tada'
if icon_value.substring(0,2)=="fa"
i.fa-fw(class=icon_value + ' ' + anima_value)
else if icon_value.substring(0,4)=="icon"
- svg.icon(aria-hidden="true" class=anima_value)
+ svg.social_icon(aria-hidden="true" class=anima_value)
use(xlink:href=`#`+ icon_value)上面的改动会将图标渲染成
class=social_icon的标签,现在我们可以区分菜单栏还是社交的图标的,如果想调节社交图标的大小就用以下的css1
2
3
4
5
6
7
8
9/* social 图标 */
svg.social_icon {
width: 1.20em;
height: 1.20em;
vertical-align: -0.15em;
fill: currentColor;
overflow: hidden;
}
/* social 图标end */举一反三,要想专门用css改动菜单栏图标大小,只需要将
[BlogRoot]\themes\butterfly\layout\includes\header\menu_item.pug文件中的svg.icon替换成svg.menu_icon,然后用以下的css1
2
3
4
5
6
7svg.menu_icon {
width: 1.28em;
height: 1.28em;
vertical-align: -0.15em;
fill: currentColor;
overflow: hidden;
}重启项目即可看到效果:
1
2
3
4# git bash
hexo cl && hexo g && hexo s
# vscode
hexo cl; hexo g; hexo s
侧边栏图标和文字自定义
点击查看教程
这里的图标也是用的iconfont的,请完成前面的图标引入教程!由于侧边栏比较多,这里就演示改网站信息,剩下的侧边栏改法几乎一样的!(记住要引入了自己的图标再来看这个教程!!!)
进入
[BlogRoot]\themes\butterfly\layout\includes\widget\card_webinfo.pug,进行以下修改,因为默认的图标是font-awesome的黑白图标,就是i.fas.fa-chart-line那一行,删除,然后引入新的图标标签,其中图标的样式、名称等参考自己的需要进行更改,样式主要是width、height、position、top这几个属性,这里的animated-hover和faa-tada是给对应的元素套上对应的class,如果装了动画依赖,扫描到这些class的元素会自动挂载动画样式,如果不想要可以去除。1
2
3
4
5
6
7
8
9
10
11
12
13
14
15
16
17
18
19
20
21
22
23
24
25
26
27
28
29
30
31
32
33
34
35
36
37if theme.aside.card_webinfo.enable
.card-widget.card-webinfo
.item-headline
- i.fas.fa-chart-line
+ a.faa-parent.animated-hover
+ svg.faa-tada.icon(style="height:25px;width:25px;fill:currentColor;position:relative;top:5px" aria-hidden="true")
+ use(xlink:href='#icon-tongji')
span= _p('aside.card_webinfo.headline')
.webinfo
if theme.aside.card_webinfo.post_count
.webinfo-item
.item-name= _p('aside.card_webinfo.article_name') + " :"
.item-count= site.posts.length
if theme.runtimeshow.enable
.webinfo-item
.item-name= _p('aside.card_webinfo.runtime.name') + " :"
.item-count#runtimeshow(data-publishDate=date_xml(theme.runtimeshow.publish_date))
i.fa-solid.fa-spinner.fa-spin
if theme.wordcount.enable && theme.wordcount.total_wordcount
.webinfo-item
.item-name=_p('aside.card_webinfo.site_wordcount') + " :"
.item-count=totalcount(site)
if theme.busuanzi.site_uv
.webinfo-item
.item-name= _p('aside.card_webinfo.site_uv_name') + " :"
.item-count#busuanzi_value_site_uv
i.fa-solid.fa-spinner.fa-spin
if theme.busuanzi.site_pv
.webinfo-item
.item-name= _p('aside.card_webinfo.site_pv_name') + " :"
.item-count#busuanzi_value_site_pv
i.fa-solid.fa-spinner.fa-spin
if theme.aside.card_webinfo.last_push_date
.webinfo-item
.item-name= _p('aside.card_webinfo.last_push_date.name') + " :"
.item-count#last-push-date(data-lastPushDate=date_xml(Date.now()))
i.fa-solid.fa-spinner.fa-spin接下来就是改文了,注意到第8行的
span= _p('aside.card_webinfo.headline'),这行代码就是渲染图标后面的文字,我们其实可以直接改成span= _p('小站资讯'),这样就已经按照自己的文字显示了,但是为了更好维护,我们遵循主题的设计原则,注意到变量aside.card_webinfo.headline,这其实是在写好的语言包中扫描对应的值,因为不同的语言对应不同的文字,如果我们设置了语言为zh-CN那么就到[BlogRoot]\themes\butterfly\languages\zh-CN.yml进行修改。yml文件是以缩进区分层级的,我们只需要寻找aside->card_webinfo->headline这一项修改为自己喜欢的内容即可1
2
3
4
5
6
7
8
9
10
11
12
13
14
15
16
17
18
19
20
21
22
23
24
25
26
27
28
29
30
31
32aside:
articles: 文章
tags: 标签
categories: 分类
card_announcement: 公告栏
card_categories: 分类
card_tags: 标签
card_archives: 归档
card_recent_post: 最新文章
card_friend_link: 通讯录
card_webinfo:
- headline: 网站资讯
+ headline: 网站资讯
article_name: 文章数目
runtime:
name: 已运行时间
unit: 天
last_push_date:
name: 最后更新时间
site_wordcount: 本站总字数
site_uv_name: 本站访客数
site_pv_name: 本站总访问量
more_button: 查看更多
card_newest_comments:
headline: 最新评论
loading_text: 正在加载中...
error: 无法获取评论,请确认相关配置是否正确
zero: 没有评论
image: 图片
link: 链接
code: 代码
card_toc: 目录最后重新编译运行即可看见效果。
1
2
3
4# git bash
hexo cl && hexo g && hexo s
# vscode
hexo cl; hexo g; hexo s
本站同款页脚(tzy大佬+微调)
点击查看教程
将
[BlogRoot]/themes/butterfly/layout/includes/footer.pug替换成如下代码这块东西分为几个部分,一个是以#ft为块的DOM,其中分为了格言、猜你想看、推荐友链三部分,参考图中的位置结合自己的喜好进行修改即可,图像、文字和链接均替换成你自己的(记住不要用我的链接!!!);if theme.footer.owner.enable起这一块是主题指定的信息版权信息,我把主题配置项的copyright和custom_text这两项留空了,因此只会显示©2022 By Fomalhaut🥝;再然后就是#workboard这块,这块的信息由js逻辑写入与更新,可以自定义;最后是p#ghbdages这块,是徽标显示,大家可以到shields.io按照自己的信息生成(不要用我的!!!):1
2
3
4
5
6
7
8
9
10
11
12
13
14
15
16
17
18
19
20
21
22
23
24
25
26
27
28
29
30
31
32
33
34
35
36
37
38
39
40
41
42
43
44
45
46
47
48
49
50
51
52
53
54
55
56
57
58
59
60
61
62
63
64
65
66
67
68
69
70
71
72
73
74
75
76
77
78
79
80
81
82
83
84
85
86
87
88
89
90
91
92
93
94
95
96
97
98
99
100
101
102
103
104
105
106
107#footer-wrap
#ft
.ft-item-1
.t-top
.t-t-l
p.ft-t.t-l-t 格言🧬
.bg-ad
div
| 再看看那个光点,它就在这里,这是家园,这是我们 —— 你所爱的每一个人,你认识的一个人,你听说过的每一个人,曾经有过的每一个人,都在它上面度过他们的一生✨
.btn-xz-box
a.btn-xz(href='https://stellarium.org/') 点击开启星辰之旅
.t-t-r
p.ft-t.t-l-t 猜你想看💡
ul.ft-links
li
a(href='/posts/eec9786.html') 魔改指南
a(href='/box/nav/') 网址导航
li
a(href='/social/link/') 我的朋友
a(href='/comments/') 留点什么
li
a(href='/personal/about/') 关于作者
a(href='/archives/') 文章归档
li
a(href='/categories/') 文章分类
a(href='/tags/') 文章标签
li
a(href='/box/Gallery/') 我的画廊
a(href='/personal/bb/') 我的唠叨
li
a(href='/site/time/') 建设进程
a(href='/site/census/') 网站统计
.ft-item-2
p.ft-t 推荐友链⌛
.ft-img-group
.img-group-item
a(href='https://www.fomal.cc/' title='Fomalhaut🥝')
img(src='https://lskypro.acozycotage.net/LightPicture/2022/12/60e5d4e39da7c077.webp' alt='')
.img-group-item
a(href='https://tzy1997.com/' title='唐志远の博客')
img(src='https://lskypro.acozycotage.net/LightPicture/2022/12/4ab83cdce942463b.jpg' alt='')
.img-group-item
a(href='https://akilar.top/' title='Akilarの糖果屋')
img(src='https://lskypro.acozycotage.net/LightPicture/2022/12/6bf1ed05796db59c.jpg' alt='')
.img-group-item
a(href='https://butterfly.js.org/' title='Butterfly')
img(src='https://lskypro.acozycotage.net/LightPicture/2022/12/64cc6a7d508026e1.png' alt='')
.img-group-item
a(href='https://anzhiy.cn/' title='安知鱼')
img(src='https://lskypro.acozycotage.net/LightPicture/2022/12/1b33fef8f5fb7e63.jpg' alt='')
.img-group-item
a(href='https://www.acozycotage.net/' title='Acozycotage')
img(src='https://lskypro.acozycotage.net/LightPicture/2022/12/6a6fe6ebfd19c465.jpg' alt='')
.img-group-item
a(href='https://cdn.netdun.net/' title='网盾星球')
img(src='https://lskypro.acozycotage.net/LightPicture/2022/12/70dee3f9d1ca10f3.webp' alt='')
.img-group-item
a(href='javascript:void(0)' title='广告位招租')
img(src='https://lskypro.acozycotage.net/LightPicture/2022/12/65307a5828af6790.webp' alt='')
if theme.footer.owner.enable
- var now = new Date()
- var nowYear = now.getFullYear()
if theme.footer.owner.since && theme.footer.owner.since != nowYear
.copyright
span!= `<b>©${theme.footer.owner.since} - ${nowYear}</b>`
span!= `<b> By ${config.author}</b>`
else
.copyright
span!= `<b>©${nowYear}</b>`
span!= `<b> By ${config.author}</b>`
if theme.footer.copyright
.framework-info
span= _p('footer.framework') + ' '
a(href='https://hexo.io')= 'Hexo'
span.footer-separator |
span= _p('footer.theme') + ' '
a(href='https://github.com/jerryc127/hexo-theme-butterfly')= 'Butterfly'
if theme.footer.custom_text
.footer_custom_text!=`${theme.footer.custom_text}`
#workboard
p#ghbdages
a.github-badge(target='_blank' href="https://hexo.io/" style='margin-inline:5px' title="博客框架为Hexo_v6.3.0")
img(src="https://sourcebucket.s3.ladydaily.com/badge/Frame-Hexo-blue.svg" alt='')
a.github-badge(target='_blank' href="https://butterfly.js.org/" style='margin-inline:5px' title="主题版本Butterfly_v4.3.1")
img(src="https://sourcebucket.s3.ladydaily.com/badge/Theme-Butterfly-6513df.svg" alt='')
a.github-badge(target='_blank' href="https://vercel.com/" style='margin-inline:5px' title="本站采用多线部署,主线路托管于Vercel")
img(src="https://sourcebucket.s3.ladydaily.com/badge/Hosted-Vercel-brightgreen.svg" alt='')
a.github-badge(target='_blank' href="https://user.51.la/" style='margin-inline:5px' title="本站数据分析得益于51la技术支持")
img(src="https://sourcebucket.s3.ladydaily.com/badge/Analytics-51la-3db1eb.svg" alt='')
a.github-badge(target='_blank' href="https://icp.gov.moe/?keyword=20226665" style='margin-inline:5px' title="本站已加入萌ICP豪华套餐,萌ICP备20226665号")
img(src="https://sourcebucket.s3.ladydaily.com/badge/萌ICP备-20226665-fe1384.svg" alt='')
a.github-badge(target='_blank' href="https://bitiful.dogecast.com/buckets" style='margin-inline:5px' title="本网站经Service Worker分流至缤纷云对象存储")
img(src=" https://sourcebucket.s3.ladydaily.com/badge/Bucket-缤纷云-9c62da.svg" alt='')
a.github-badge(target='_blank' href="https://www.netdun.net/" style='margin-inline:5px' title="本站使用网盾星球提供CDN加速与防护")
img(src="https://sourcebucket.s3.ladydaily.com/badge/CDN-网盾星球-fff2cc.svg" alt='')
a.github-badge(target='_blank' href="https://github.com/" style='margin-inline:5px' title="本网站源码由Github提供存储仓库")
img(src=" https://sourcebucket.s3.ladydaily.com/badge/Source-Github-d021d6.svg" alt='')将以下代码复制到自定义的
custom.css中,其中颜色、圆角等可以根据你自己的喜好进行修改:1
2
3
4
5
6
7
8
9
10
11
12
13
14
15
16
17
18
19
20
21
22
23
24
25
26
27
28
29
30
31
32
33
34
35
36
37
38
39
40
41
42
43
44
45
46
47
48
49
50
51
52
53
54
55
56
57
58
59
60
61
62
63
64
65
66
67
68
69
70
71
72
73
74
75
76
77
78
79
80
81
82
83
84
85
86
87
88
89
90
91
92
93
94
95
96
97
98
99
100
101
102
103
104
105
106
107
108
109
110
111
112
113
114
115
116
117
118
119
120
121
122
123
124
125
126
127
128
129
130
131
132
133
134
135
136
137
138
139
140
141
142
143
144
145
146
147
148
149
150
151
152
153
154
155
156
157
158
159
160
161
162
163
164
165
166
167
168
169
170
171
172
173
174
175
176
177
178
179
180
181
182
183
184
185
186
187
188
189
190
191
192
193
194
195
196
197
198
199
200
201
202
203
204
205
206
207
208
209
210
211
212
213
214
215
216
217
218
219
220
221
222
223
224
225
226
227
228
229
230
231
232
233
234
235
236
237
238
239
240
241
242
243
244
245
246
247
248/*----------------------------- 页脚样式 -----------------------------------*/
/* tzy页脚样式 */
#ft {
max-width: 1200px;
margin: 0 auto 12px;
display: flex;
color: rgb(255 255 255 / 80%) ;
text-align: left;
flex-wrap: wrap;
}
.ft-item-1,
.ft-item-2 {
display: flex;
height: 100%;
padding: 2px 14px;
}
.ft-item-1 {
flex-direction: column;
flex: 2;
}
.ft-item-2 {
flex: 1;
flex-direction: column;
}
.t-top {
display: flex;
}
.t-top .t-t-l {
display: flex;
flex-direction: column;
flex: 1.4;
margin-right: 10px;
}
.t-top .t-t-l .bg-ad {
width: 85%;
border-radius: 10px;
padding: 0 10px;
}
.btn-xz-box {
margin-top: 10px;
}
/* 按钮背景颜色等 */
.btn-xz {
display: block;
background-color: var(--btn-bg);
color: var(--btn-color);
text-align: center;
line-height: 2.4;
margin: 8px 0;
}
.btn-xz:hover {
text-decoration: none ;
}
/* 按钮悬浮颜色 */
.btn-xz-box:hover .btn-xz {
background-color: var(--text-bg-hover);
}
.t-top .t-t-r {
display: flex;
flex-direction: column;
flex: 1;
}
.ft-links {
padding: 0 14px;
list-style: none;
margin-top: 0 ;
}
.ft-links li a {
display: inline-block ;
width: 50%;
}
/* 链接悬浮颜色 */
.ft-links li a:hover {
text-decoration: none ;
color: var(--theme-color) ;
}
.ft-item-2 .ft-img-group {
width: 100%;
}
.ft-t {
font-size: 1.1rem;
margin-bottom: 20px;
line-height: 1;
font-weight: 600;
}
.t-l-t {
padding-left: 14px;
}
.ft-item-2 .ft-img-group .img-group-item {
display: inline-block;
width: 18.4%;
margin-right: 14px;
margin-bottom: 6px;
}
.ft-item-2 .ft-img-group .img-group-item a {
display: inline-block;
width: 100%;
height: 100%;
}
.ft-item-2 .ft-img-group .img-group-item a img {
width: 100%;
max-height: 80px;
border-radius: 10px;
}
/* 头像悬浮颜色框 */
.ft-item-2 .ft-img-group .img-group-item a img:hover {
border: 2px solid var(--theme-color);
}
@media screen and (max-width: 768px) {
.ft-item-1 {
flex-basis: 100% ;
}
.ft-item-2 {
flex-basis: 100% ;
}
.t-top .t-t-l .bg-ad {
width: 100%;
}
}
@media screen and (max-width: 576px) {
.t-top {
flex-wrap: wrap;
}
.t-top .t-t-l {
flex-basis: 100% ;
}
.t-top .t-t-r {
margin-top: 16px;
flex-basis: 100% ;
}
}
#footer-wrap a {
border-radius: 30px;
}
#footer-wrap {
padding: 20px 20px;
}
/* 页脚心跳动画 */
#heartbeat {
color: red;
animation: iconAnimate 1s ease-in-out infinite;
}
@-moz-keyframes iconAnimate {
0%,
100% {
transform: scale(1);
}
10%,
30% {
transform: scale(0.9);
}
20%,
40%,
60%,
80% {
transform: scale(1.1);
}
50%,
70% {
transform: scale(1.1);
}
}
@-webkit-keyframes iconAnimate {
0%,
100% {
transform: scale(1);
}
10%,
30% {
transform: scale(0.9);
}
20%,
40%,
60%,
80% {
transform: scale(1.1);
}
50%,
70% {
transform: scale(1.1);
}
}
@-o-keyframes iconAnimate {
0%,
100% {
transform: scale(1);
}
10%,
30% {
transform: scale(0.9);
}
20%,
40%,
60%,
80% {
transform: scale(1.1);
}
50%,
70% {
transform: scale(1.1);
}
}
@keyframes iconAnimate {
0%,
100% {
transform: scale(1);
}
10%,
30% {
transform: scale(0.9);
}
20%,
40%,
60%,
80% {
transform: scale(1.1);
}
50%,
70% {
transform: scale(1.1);
}
}
/*----------------------------- end -----------------------------------*/然后计时器还要往
#footer-wrap这块元素上面写入网站运行时间等信息,新建文件[BlogRoot]\source\js\runtime.js,写入如下代码。这里要修改的几块东西是:网站诞生时间、currentTimeHtml这块东西;其中currentTimeHtml分为了两种模式,对应两个不同的图标,自行研究一下就懂!1
2
3
4
5
6
7
8
9
10
11
12
13
14
15
16
17
18
19
20
21
22
23
24
25
26
27
28
29
30
31var now = new Date();
function createtime() {
// 当前时间
now.setTime(now.getTime() + 1000);
var start = new Date("08/01/2022 00:00:00"); // 旅行者1号开始计算的时间
var dis = Math.trunc(23400000000 + ((now - start) / 1000) * 17); // 距离=秒数*速度 记住转换毫秒
var unit = (dis / 149600000).toFixed(6); // 天文单位
var grt = new Date("02/21/2024 00:00:00"); // 网站诞生时间
var days = (now - grt) / 1e3 / 60 / 60 / 24,
dnum = Math.floor(days),
hours = (now - grt) / 1e3 / 60 / 60 - 24 * dnum,
hnum = Math.floor(hours);
1 == String(hnum).length && (hnum = "0" + hnum);
var minutes = (now - grt) / 1e3 / 60 - 1440 * dnum - 60 * hnum,
mnum = Math.floor(minutes);
1 == String(mnum).length && (mnum = "0" + mnum);
var seconds = (now - grt) / 1e3 - 86400 * dnum - 3600 * hnum - 60 * mnum,
snum = Math.round(seconds);
1 == String(snum).length && (snum = "0" + snum);
let currentTimeHtml = "";
(currentTimeHtml =
hnum < 18 && hnum >= 9
? `<img class='boardsign' src='https://img.shields.io/badge/-营业中-6adea8?style=social&logo=cakephp' title='什么时候能够实现财富自由呀~'><br> <div style="font-size:13px;font-weight:bold">本站居然运行了 ${dnum} 天 ${hnum} 小时 ${mnum} 分 ${snum} 秒 <i id="heartbeat" class='fas fa-heartbeat'></i> <br> 旅行者 1 号当前距离地球 ${dis} 千米,约为 ${unit} 个天文单位 🚀</div>`
: `<img class='boardsign' src='https://img.shields.io/badge/-打烊了-6adea8?style=social&logo=coffeescript' title='下班了就该开开心心地玩耍~'><br> <div style="font-size:13px;font-weight:bold">本站居然运行了 ${dnum} 天 ${hnum} 小时 ${mnum} 分 ${snum} 秒 <i id="heartbeat" class='fas fa-heartbeat'></i> <br> 旅行者 1 号当前距离地球 ${dis} 千米,约为 ${unit} 个天文单位 🚀</div>`),
document.getElementById("workboard") &&
(document.getElementById("workboard").innerHTML = currentTimeHtml);
}
// 设置重复执行函数,周期1000ms
setInterval(() => {
createtime();
}, 1000);在主题配置文件
_config.butterfly.yml引入该runtime.js文件:1
2
3inject:
bottom:
+ - <script defer src="/js/runtime.js"></script> # 页脚计时器到这里你已经成功了 99.99%,最后重新编译运行即可看见效果
1
2
3
4# git bash
hexo cl && hexo g && hexo s
# vscode
hexo cl; hexo g; hexo s
欢迎信息显示地理位置
点击查看教程
获取
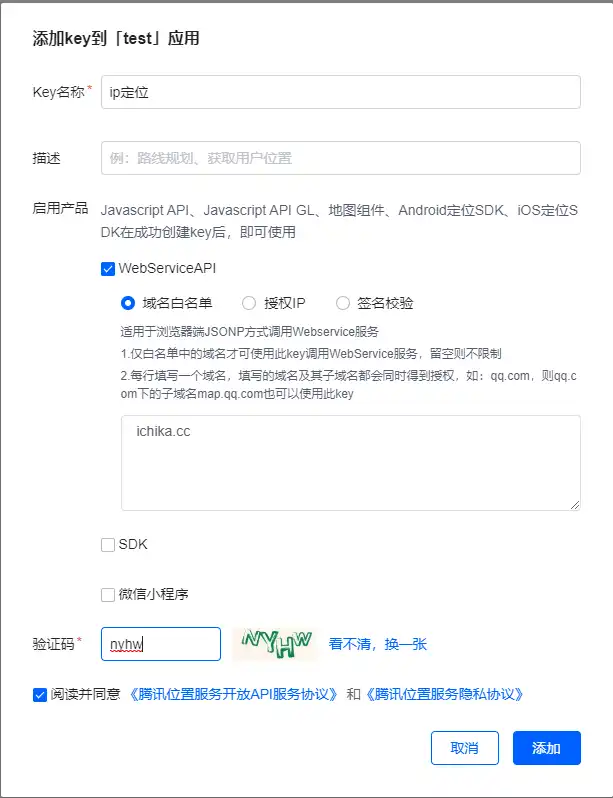
API Key:进入腾讯位置服务应用管理界面,点击创建应用,应用名称和类型随便填。在新创建的应用中点击添加key,产品选择WebServiceAPI,域名白名单填自己的域名或不填。把得到的key记下。如果开启白名单记得把localhost也加上
新建
[BlogRoot]\source\js\txmap.js,并写入如下代码,记住替换key的内容:1
2
3
4
5
6
7
8
9
10
11
12
13
14
15
16
17
18
19
20
21
22
23
24
25
26
27
28
29
30
31
32
33
34
35
36
37
38
39
40
41
42
43
44
45
46
47
48
49
50
51
52
53
54
55
56
57
58
59
60
61
62
63
64
65
66
67
68
69
70
71
72
73
74
75
76
77
78
79
80
81
82
83
84
85
86
87
88
89
90
91
92
93
94
95
96
97
98
99
100
101
102
103
104
105
106
107
108
109
110
111
112
113
114
115
116
117
118
119
120
121
122
123
124
125
126
127
128
129
130
131
132
133
134
135
136
137
138
139
140
141
142
143
144
145
146
147
148
149
150
151
152
153
154
155
156
157
158
159
160
161
162
163
164
165
166
167
168
169
170
171
172
173
174
175
176
177
178
179
180
181
182
183
184
185
186
187
188
189
190
191
192
193
194
195
196
197
198
199
200
201
202
203
204
205
206
207
208
209
210
211
212
213
214
215
216
217
218
219
220
221
222
223
224
225//get请求
$.ajax({
type: 'get',
url: 'https://apis.map.qq.com/ws/location/v1/ip',
data: {
key: '你的key',
output: 'jsonp',
},
dataType: 'jsonp',
success: function (res) {
ipLoacation = res;
}
})
function getDistance(e1, n1, e2, n2) {
const R = 6371
const { sin, cos, asin, PI, hypot } = Math
let getPoint = (e, n) => {
e *= PI / 180
n *= PI / 180
return { x: cos(n) * cos(e), y: cos(n) * sin(e), z: sin(n) }
}
let a = getPoint(e1, n1)
let b = getPoint(e2, n2)
let c = hypot(a.x - b.x, a.y - b.y, a.z - b.z)
let r = asin(c / 2) * 2 * R
return Math.round(r);
}
function showWelcome() {
let dist = getDistance(113.34499552, 23.15537143, ipLoacation.result.location.lng, ipLoacation.result.location.lat); //这里换成自己的经纬度
let pos = ipLoacation.result.ad_info.nation;
let ip;
let posdesc;
//根据国家、省份、城市信息自定义欢迎语
switch (ipLoacation.result.ad_info.nation) {
case "日本":
posdesc = "よろしく,一起去看樱花吗";
break;
case "美国":
posdesc = "Let us live in peace!";
break;
case "英国":
posdesc = "想同你一起夜乘伦敦眼";
break;
case "俄罗斯":
posdesc = "干了这瓶伏特加!";
break;
case "法国":
posdesc = "C'est La Vie";
break;
case "德国":
posdesc = "Die Zeit verging im Fluge.";
break;
case "澳大利亚":
posdesc = "一起去大堡礁吧!";
break;
case "加拿大":
posdesc = "拾起一片枫叶赠予你";
break;
case "中国":
pos = ipLoacation.result.ad_info.province + " " + ipLoacation.result.ad_info.city + " " + ipLoacation.result.ad_info.district;
ip = ipLoacation.result.ip;
switch (ipLoacation.result.ad_info.province) {
case "北京市":
posdesc = "北——京——欢迎你~~~";
break;
case "天津市":
posdesc = "讲段相声吧。";
break;
case "河北省":
posdesc = "山势巍巍成壁垒,天下雄关。铁马金戈由此向,无限江山。";
break;
case "山西省":
posdesc = "展开坐具长三尺,已占山河五百余。";
break;
case "内蒙古自治区":
posdesc = "天苍苍,野茫茫,风吹草低见牛羊。";
break;
case "辽宁省":
posdesc = "我想吃烤鸡架!";
break;
case "吉林省":
posdesc = "状元阁就是东北烧烤之王。";
break;
case "黑龙江省":
posdesc = "很喜欢哈尔滨大剧院。";
break;
case "上海市":
posdesc = "众所周知,中国只有两个城市。";
break;
case "江苏省":
switch (ipLoacation.result.ad_info.city) {
case "南京市":
posdesc = "这是我挺想去的城市啦。";
break;
case "苏州市":
posdesc = "上有天堂,下有苏杭。";
break;
default:
posdesc = "散装是必须要散装的。";
break;
}
break;
case "浙江省":
posdesc = "东风渐绿西湖柳,雁已还人未南归。";
break;
case "河南省":
switch (ipLoacation.result.ad_info.city) {
case "郑州市":
posdesc = "豫州之域,天地之中。";
break;
case "南阳市":
posdesc = "臣本布衣,躬耕于南阳。此南阳非彼南阳!";
break;
case "驻马店市":
posdesc = "峰峰有奇石,石石挟仙气。嵖岈山的花很美哦!";
break;
case "开封市":
posdesc = "刚正不阿包青天。";
break;
case "洛阳市":
posdesc = "洛阳牡丹甲天下。";
break;
default:
posdesc = "可否带我品尝河南烩面啦?";
break;
}
break;
case "安徽省":
posdesc = "蚌埠住了,芜湖起飞。";
break;
case "福建省":
posdesc = "井邑白云间,岩城远带山。";
break;
case "江西省":
posdesc = "落霞与孤鹜齐飞,秋水共长天一色。";
break;
case "山东省":
posdesc = "遥望齐州九点烟,一泓海水杯中泻。";
break;
case "湖北省":
posdesc = "来碗热干面!";
break;
case "湖南省":
posdesc = "74751,长沙斯塔克。";
break;
case "广东省":
posdesc = "老板来两斤福建人。";
break;
case "广西壮族自治区":
posdesc = "桂林山水甲天下。";
break;
case "海南省":
posdesc = "朝观日出逐白浪,夕看云起收霞光。";
break;
case "四川省":
posdesc = "康康川妹子。";
break;
case "贵州省":
posdesc = "茅台,学生,再塞200。";
break;
case "云南省":
posdesc = "玉龙飞舞云缠绕,万仞冰川直耸天。";
break;
case "西藏自治区":
posdesc = "躺在茫茫草原上,仰望蓝天。";
break;
case "陕西省":
posdesc = "来份臊子面加馍。";
break;
case "甘肃省":
posdesc = "羌笛何须怨杨柳,春风不度玉门关。";
break;
case "青海省":
posdesc = "牛肉干和老酸奶都好好吃。";
break;
case "宁夏回族自治区":
posdesc = "大漠孤烟直,长河落日圆。";
break;
case "新疆维吾尔自治区":
posdesc = "驼铃古道丝绸路,胡马犹闻唐汉风。";
break;
case "台湾省":
posdesc = "我在这头,大陆在那头。";
break;
case "香港特别行政区":
posdesc = "永定贼有残留地鬼嚎,迎击光非岁玉。";
break;
case "澳门特别行政区":
posdesc = "性感荷官,在线发牌。";
break;
default:
posdesc = "带我去你的城市逛逛吧!";
break;
}
break;
default:
posdesc = "带我去你的国家逛逛吧。";
break;
}
//根据本地时间切换欢迎语
let timeChange;
let date = new Date();
if (date.getHours() >= 5 && date.getHours() < 11) timeChange = "<span>上午好</span>,一日之计在于晨!";
else if (date.getHours() >= 11 && date.getHours() < 13) timeChange = "<span>中午好</span>,该摸鱼吃午饭了。";
else if (date.getHours() >= 13 && date.getHours() < 15) timeChange = "<span>下午好</span>,懒懒地睡个午觉吧!";
else if (date.getHours() >= 15 && date.getHours() < 16) timeChange = "<span>三点几啦</span>,一起饮茶呀!";
else if (date.getHours() >= 16 && date.getHours() < 19) timeChange = "<span>夕阳无限好!</span>";
else if (date.getHours() >= 19 && date.getHours() < 24) timeChange = "<span>晚上好</span>,夜生活嗨起来!";
else timeChange = "夜深了,早点休息,少熬夜。";
try {
//自定义文本和需要放的位置
document.getElementById("welcome-info").innerHTML =
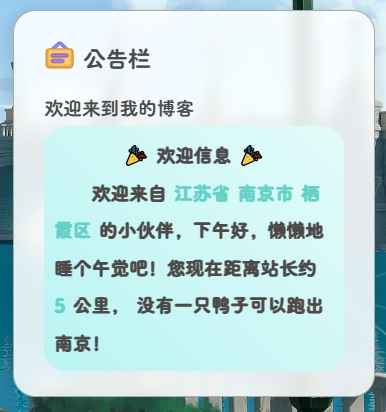
`<b><center>🎉 欢迎信息 🎉</center>  欢迎来自 <span style="color:var(--theme-color)">${pos}</span> 的小伙伴,${timeChange}您现在距离站长约 <span style="color:var(--theme-color)">${dist}</span> 公里,当前的IP地址为: <span style="color:var(--theme-color)">${ip}</span>, ${posdesc}</b>`;
} catch (err) {
// console.log("Pjax无法获取#welcome-info元素🙄🙄🙄")
}
}
window.onload = showWelcome;
// 如果使用了pjax在加上下面这行代码
document.addEventListener('pjax:complete', showWelcome);在主题配置文件
[BlogRoot]\_config.butterfly.yml中引入jQuery依赖和刚刚的js文件:1
2
3
4inject:
bottom:
+ - <script src="https://cdn.staticfile.org/jquery/3.6.3/jquery.min.js"></script> # jQuery
+ - <script async data-pjax src="/js/txmap.js"></script> # 腾讯位置API在需要展示文本的容器上添加相应id(welcome-info)就可以了,例如我想添加在网站公告栏信息的下方,于是就在
[BlogRoot]\themes\butterfly\layout\includes\widget\card_announcement.pug的最后一行加上这个,缩进与上一行相同即可1
2
3.announcement_content!= theme.aside.card_announcement.content
//- 添加欢迎访客的信息
+ #welcome-info在
custom.css自定义样式里添加如下代码,可以根据你自己的喜好去改1
2
3
4
5
6
7
8
9/* 欢迎信息 */
#welcome-info {
background: linear-gradient(45deg, #b9f4f3, #e3fbf9);
border-radius: 18px;
padding: 8px;
}
[data-theme="dark"] #welcome-info {
background: #212121;
}hexo三连即可看到效果
1
2
3
4
# git bash
hexo cl && hexo g && hexo s
# vscode
hexo cl; hexo g; hexo s
听话的鼠标魔改
点击查看教程
新建文件
[BlogRoot]\source\js\cursor.js,在里面写上如下代码:1
2
3
4
5
6
7
8
9
10
11
12
13
14
15
16
17
18
19
20
21
22
23
24
25
26
27
28
29
30
31
32
33
34
35
36
37
38
39
40
41
42
43
44
45
46
47
48
49
50
51
52
53
54
55
56
57
58
59
60
61
62
63
64
65
66
67
68
69
70
71
72
73
74
75
76
77
78
79
80
81
82
83
84
85
86
87
88
89
90
91
92
93
94
95
96
97
98
99
100/* 听话鼠标 start */
var CURSOR;
Math.lerp = (a, b, n) => (1 - n) * a + n * b;
const getStyle2 = (el, attr) => {
try {
return window.getComputedStyle
? window.getComputedStyle(el)[attr]
: el.currentStyle[attr];
} catch (e) { }
return "";
};
// 为了屏蔽异步加载导致无法读取颜色值,这里统一用哈希表预处理
const map = new Map();
map.set('red', "rgb(241, 71, 71)");
map.set('orange', "rgb(241, 162, 71)");
map.set('yellow', "rgb(241, 238, 71)")
map.set('purple', "rgb(179, 71, 241)");
map.set('blue', "rgb(102, 204, 255)");
map.set('gray', "rgb(226, 226, 226)");
map.set('green', "rgb(57, 197, 187)");
map.set('whitegray', "rgb(241, 241, 241)");
map.set('pink', "rgb(237, 112, 155)");
map.set('black', "rgb(0, 0, 0)");
map.set('darkblue', "rgb(97, 100, 159)");
map.set('heoblue', "rgb(66, 90, 239)");
class Cursor {
constructor() {
this.pos = { curr: null, prev: null };
this.pt = [];
this.create();
this.init();
this.render();
}
move(left, top) {
this.cursor.style["left"] = `${left}px`;
this.cursor.style["top"] = `${top}px`;
}
create() {
if (!this.cursor) {
this.cursor = document.createElement("div");
this.cursor.id = "cursor";
this.cursor.classList.add("hidden");
document.body.append(this.cursor);
}
var el = document.getElementsByTagName('*');
for (let i = 0; i < el.length; i++)
if (getStyle2(el[i], "cursor") == "pointer")
this.pt.push(el[i].outerHTML);
var colorVal = map.get('green');
document.body.appendChild((this.scr = document.createElement("style")));
this.scr.innerHTML = `* {cursor: url("data:image/svg+xml,<svg xmlns='http://www.w3.org/2000/svg' viewBox='0 0 8 8' width='8px' height='8px'><circle cx='4' cy='4' r='4' opacity='1.0' fill='` + colorVal + `'/></svg>") 4 4, auto}`;
}
refresh() {
this.scr.remove();
this.cursor.classList.remove("hover");
this.cursor.classList.remove("active");
this.pos = { curr: null, prev: null };
this.pt = [];
this.create();
this.init();
this.render();
}
init() {
document.onmouseover = e => this.pt.includes(e.target.outerHTML) && this.cursor.classList.add("hover");
document.onmouseout = e => this.pt.includes(e.target.outerHTML) && this.cursor.classList.remove("hover");
document.onmousemove = e => { (this.pos.curr == null) && this.move(e.clientX - 8, e.clientY - 8); this.pos.curr = { x: e.clientX - 8, y: e.clientY - 8 }; this.cursor.classList.remove("hidden"); };
document.onmouseenter = e => this.cursor.classList.remove("hidden");
document.onmouseleave = e => this.cursor.classList.add("hidden");
document.onmousedown = e => this.cursor.classList.add("active");
document.onmouseup = e => this.cursor.classList.remove("active");
}
render() {
if (this.pos.prev) {
// 跟踪速度调节
this.pos.prev.x = Math.lerp(this.pos.prev.x, this.pos.curr.x, 0.15);
this.pos.prev.y = Math.lerp(this.pos.prev.y, this.pos.curr.y, 0.15);
this.move(this.pos.prev.x, this.pos.prev.y);
} else {
this.pos.prev = this.pos.curr;
}
requestAnimationFrame(() => this.render());
}
}
(() => {
CURSOR = new Cursor();
// 需要重新获取列表时,使用 CURSOR.refresh()
})();
/* 听话鼠标 end */其中比较重要的参数就是鼠标的尺寸和颜色,已经在上图中标出,目前发现颜色只支持RGB写法和固有名称写法(例如red这种),其他参数也可以自行摸索:
1
* {cursor: url("data:image/svg+xml,<svg xmlns='http://www.w3.org/2000/svg' viewBox='0 0 8 8' width='8px' height='8px'><circle cx='4' cy='4' r='4' opacity='1.0' fill='` + colorVal + `'/></svg>") 4 4, auto}
在
[BlogRoot]\source\css\custom.css添加如下代码:1
2
3
4
5
6
7
8
9
10
11
12
13
14
15
16
17
18
19
20
21
22
23
24
25
26
27
28
29
30
31
32
33
34
35
36/* 鼠标样式 */
#cursor {
position: fixed;
width: 16px;
height: 16px;
/* 这里改变跟随的底色 */
background: var(--theme-color);
border-radius: 8px;
opacity: 0.25;
z-index: 10086;
pointer-events: none;
transition: 0.2s ease-in-out;
transition-property: background, opacity, transform;
}
#cursor.hidden {
opacity: 0;
}
#cursor.hover {
opacity: 0.1;
transform: scale(2.5);
-webkit-transform: scale(2.5);
-moz-transform: scale(2.5);
-ms-transform: scale(2.5);
-o-transform: scale(2.5);
}
#cursor.active {
opacity: 0.5;
transform: scale(0.5);
-webkit-transform: scale(0.5);
-moz-transform: scale(0.5);
-ms-transform: scale(0.5);
-o-transform: scale(0.5);
}这里比较重要的参数就是鼠标跟随的圆形颜色,可以根据自己的喜好进行更改:
1
2
3
4#cursor {
/* 这里改变跟随的底色 */
background: rgb(57, 197, 187);
}在主题配置文件
_config.butterfly.yml文件的inject配置项引入刚刚创建的css文件和js文件:1
2
3
4
5inject:
head:
+ - <link rel="stylesheet" href="/css/custom.css">
bottom:
+ - <script defer src="/js/cursor.js"></script>重启项目即可看见效果:
1
2
3
4# git bash
hexo cl && hexo g && hexo s
# vscode
hexo cl; hexo g; hexo s
顶部渐变加载条
点击查看教程
新建
[BlogRoot]\source\css\progress_bar.css文件,写入以下内容(或者你在[BlogRoot]\source\css\custom.css直接加也行,最后在配置文件记得引入即可)1
2
3
4
5
6
7
8
9
10
11
12
13
14
15
16
17
18
19
20
21
22
23
24
25
26
27
28
29
30
31
32
33
34
35
36
37
38
39
40
41
42
43
44
45
46
47
48
49
50
51
52
53
54
55
56
57
58
59
60
61
62
63
64
65
66
67/* 顶部胶囊加载条 */
.pace {
-webkit-pointer-events: none;
pointer-events: none;
-webkit-user-select: none;
-moz-user-select: none;
user-select: none;
z-index: 2000;
position: fixed;
margin: auto;
top: 10px;
left: 0;
right: 0;
height: 8px;
border-radius: 8px;
width: 5rem;
background: #eaecf2;
border: 1px #e3e8f7;
overflow: hidden;
}
.pace-inactive .pace-progress {
opacity: 0;
transition: 0.3s ease-in;
}
.pace .pace-progress {
-webkit-box-sizing: border-box;
-moz-box-sizing: border-box;
-ms-box-sizing: border-box;
-o-box-sizing: border-box;
box-sizing: border-box;
-webkit-transform: translate3d(0, 0, 0);
-moz-transform: translate3d(0, 0, 0);
-ms-transform: translate3d(0, 0, 0);
-o-transform: translate3d(0, 0, 0);
transform: translate3d(0, 0, 0);
max-width: 200px;
position: absolute;
z-index: 2000;
display: block;
top: 0;
right: 100%;
height: 100%;
width: 100%;
background: linear-gradient(-45deg, #ee7752, #e73c7e, #23a6d5, #23d5ab);
animation: gradient 1.5s ease infinite;
background-size: 200%;
}
.pace.pace-inactive {
opacity: 0;
transition: 0.3s;
top: -8px;
}
@keyframes gradient {
0% {
background-position: 0% 50%;
}
50% {
background-position: 100% 50%;
}
100% {
background-position: 0% 50%;
}
}
/* 顶部胶囊加载条end */在主题配置文件
_config.butterfly.yml的inject配置项加入刚刚的css样式和必须的js依赖:1
2
3
4
5
6
7inject:
head:
- xxx
- <link rel="stylesheet" href="/css/progress_bar.css" media="defer" onload="this.media='all'">
bottom:
- xxx
- <script async src="//npm.elemecdn.com/pace-js@1.2.4/pace.min.js"></script>
文章统计引入 echarts
点击查看教程
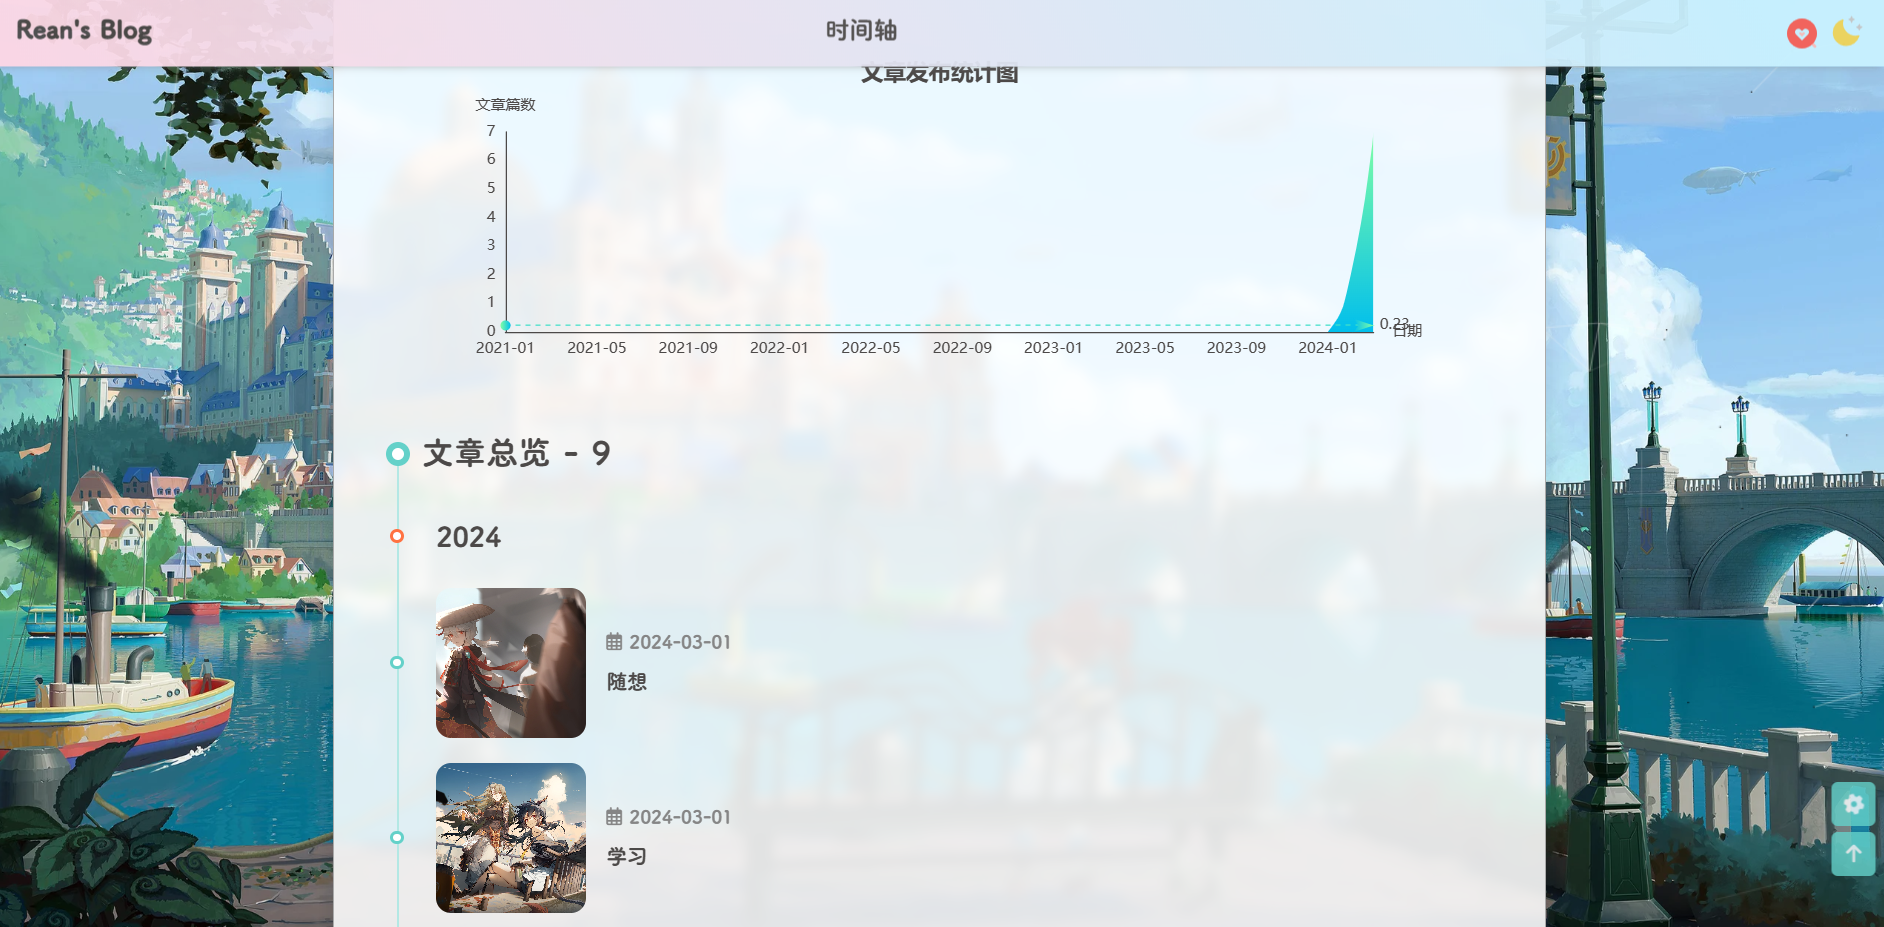
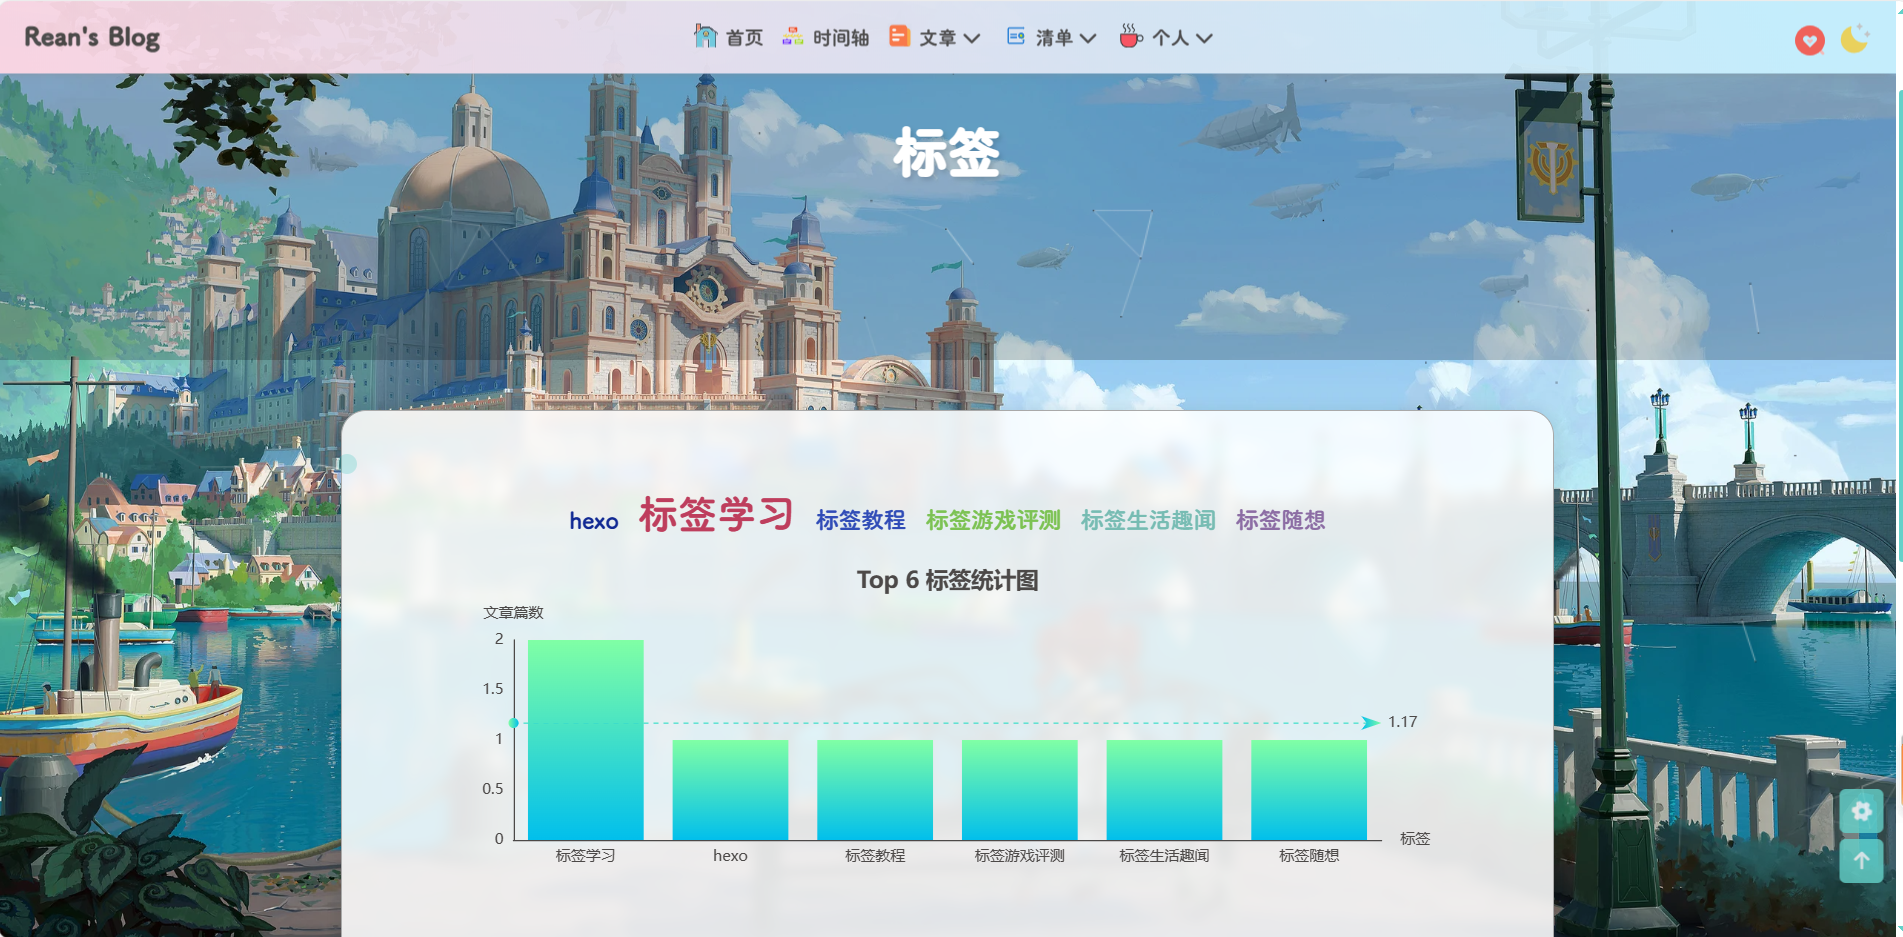
详情请见:Hexo 博客文章统计图
在命令行执行命令
1
hexo new page charts
引入 echarts.js
- echarts.js 必须在渲染 echarts 实例的 JavaScript 前引入。
- 需要在统计图的前引入
echarts.js文件,最好是在页面的头部引入。
以 butterfly 主题为例,可以在
[Blogroot]\_config.butterfly.yml的inject配置项中引入echart.js文件。1
2
3inject:
head:
- <script src="https://npm.elemecdn.com/echarts@4.9.0/dist/echarts.min.js"></script> # 引入 echarts文章统计代码
若出现控制台报错
Cannot find module 'cheerio'。解决方案:
安装
cheerio,控制台执行npm i cheerio --save。以 butterfly 主题为例,可以在
[Blogroot]\themes\butterfly\scripts\helpers\目录下新建charts.js文件,然后添加以下内容:1
2
3
4
5
6
7
8
9
10
11
12
13
14
15
16
17
18
19
20
21
22
23
24
25
26
27
28
29
30
31
32
33
34
35
36
37
38
39
40
41
42
43
44
45
46
47
48
49
50
51
52
53
54
55
56
57
58
59
60
61
62
63
64
65
66
67
68
69
70
71
72
73
74
75
76
77
78
79
80
81
82
83
84
85
86
87
88
89
90
91
92
93
94
95
96
97
98
99
100
101
102
103
104
105
106
107
108
109
110
111
112
113
114
115
116
117
118
119
120
121
122
123
124
125
126
127
128
129
130
131
132
133
134
135
136
137
138
139
140
141
142
143
144
145
146
147
148
149
150
151
152
153
154
155
156
157
158
159
160
161
162
163
164
165
166
167
168
169
170
171
172
173
174
175
176
177
178
179
180
181
182
183
184
185
186
187
188
189
190
191
192
193
194
195
196
197
198
199
200
201
202
203
204
205
206
207
208
209
210
211
212
213
214
215
216
217
218
219
220
221
222
223
224
225
226
227
228
229
230
231
232
233
234
235
236
237
238
239
240
241
242
243
244
245
246
247
248
249
250
251
252
253
254
255
256
257
258
259
260
261
262
263
264
265
266
267
268
269
270
271
272
273
274
275
276
277
278
279
280
281
282
283
284
285
286
287
288
289
290
291
292
293
294
295
296
297
298
299
300
301
302
303
304
305
306
307
308
309
310
311
312
313
314
315
316
317
318
319
320
321
322
323
324
325
326
327
328
329
330
331
332
333
334
335
336
337
338
339
340
341
342
343
344
345
346
347
348
349
350
351
352
353
354
355
356
357
358
359
360
361
362
363
364
365
366
367
368
369
370
371
372
373
374
375
376
377
378
379
380
381
382
383
384
385
386
387
388
389
390
391
392
393
394
395
396
397const cheerio = require('cheerio')
const moment = require('moment')
hexo.extend.filter.register('after_render:html', function (locals) {
const $ = cheerio.load(locals)
const post = $('#posts-chart')
const tag = $('#tags-chart')
const category = $('#categories-chart')
const htmlEncode = false
if (post.length > 0 || tag.length > 0 || category.length > 0) {
if (post.length > 0 && $('#postsChart').length === 0) {
if (post.attr('data-encode') === 'true') htmlEncode = true
post.after(postsChart(post.attr('data-start')))
}
if (tag.length > 0 && $('#tagsChart').length === 0) {
if (tag.attr('data-encode') === 'true') htmlEncode = true
tag.after(tagsChart(tag.attr('data-length')))
}
if (category.length > 0 && $('#categoriesChart').length === 0) {
if (category.attr('data-encode') === 'true') htmlEncode = true
category.after(categoriesChart(category.attr('data-parent')))
}
if (htmlEncode) {
return $.root().html().replace(/&#/g, '&#')
} else {
return $.root().html()
}
} else {
return locals
}
}, 15)
function postsChart (startMonth) {
const startDate = moment(startMonth || '2020-01')
const endDate = moment()
const monthMap = new Map()
const dayTime = 3600 * 24 * 1000
for (let time = startDate; time <= endDate; time += dayTime) {
const month = moment(time).format('YYYY-MM')
if (!monthMap.has(month)) {
monthMap.set(month, 0)
}
}
hexo.locals.get('posts').forEach(function (post) {
const month = post.date.format('YYYY-MM')
if (monthMap.has(month)) {
monthMap.set(month, monthMap.get(month) + 1)
}
})
const monthArr = JSON.stringify([...monthMap.keys()])
const monthValueArr = JSON.stringify([...monthMap.values()])
return `
<script id="postsChart">
var color = document.documentElement.getAttribute('data-theme') === 'light' ? '#4c4948' : 'rgba(255,255,255,0.7)'
var postsChart = echarts.init(document.getElementById('posts-chart'), 'light');
var postsOption = {
title: {
text: '文章发布统计图',
x: 'center',
textStyle: {
color: color
}
},
tooltip: {
trigger: 'axis'
},
xAxis: {
name: '日期',
type: 'category',
boundaryGap: false,
nameTextStyle: {
color: color
},
axisTick: {
show: false
},
axisLabel: {
show: true,
color: color
},
axisLine: {
show: true,
lineStyle: {
color: color
}
},
data: ${monthArr}
},
yAxis: {
name: '文章篇数',
type: 'value',
nameTextStyle: {
color: color
},
splitLine: {
show: false
},
axisTick: {
show: false
},
axisLabel: {
show: true,
color: color
},
axisLine: {
show: true,
lineStyle: {
color: color
}
}
},
series: [{
name: '文章篇数',
type: 'line',
smooth: true,
lineStyle: {
width: 0
},
showSymbol: false,
itemStyle: {
opacity: 1,
color: new echarts.graphic.LinearGradient(0, 0, 0, 1, [{
offset: 0,
color: 'rgba(128, 255, 165)'
},
{
offset: 1,
color: 'rgba(1, 191, 236)'
}])
},
areaStyle: {
opacity: 1,
color: new echarts.graphic.LinearGradient(0, 0, 0, 1, [{
offset: 0,
color: 'rgba(128, 255, 165)'
}, {
offset: 1,
color: 'rgba(1, 191, 236)'
}])
},
data: ${monthValueArr},
markLine: {
data: [{
name: '平均值',
type: 'average',
label: {
color: color
}
}]
}
}]
};
postsChart.setOption(postsOption);
window.addEventListener('resize', () => {
postsChart.resize();
});
postsChart.on('click', 'series', (event) => {
if (event.componentType === 'series') window.location.href = '/archives/' + event.name.replace('-', '/');
});
</script>`
}
function tagsChart (len) {
const tagArr = []
hexo.locals.get('tags').map(function (tag) {
tagArr.push({ name: tag.name, value: tag.length, path: tag.path })
})
tagArr.sort((a, b) => { return b.value - a.value })
const dataLength = Math.min(tagArr.length, len) || tagArr.length
const tagNameArr = []
for (let i = 0; i < dataLength; i++) {
tagNameArr.push(tagArr[i].name)
}
const tagNameArrJson = JSON.stringify(tagNameArr)
const tagArrJson = JSON.stringify(tagArr)
return `
<script id="tagsChart">
var color = document.documentElement.getAttribute('data-theme') === 'light' ? '#4c4948' : 'rgba(255,255,255,0.7)'
var tagsChart = echarts.init(document.getElementById('tags-chart'), 'light');
var tagsOption = {
title: {
text: 'Top ${dataLength} 标签统计图',
x: 'center',
textStyle: {
color: color
}
},
tooltip: {},
xAxis: {
name: '标签',
type: 'category',
nameTextStyle: {
color: color
},
axisTick: {
show: false
},
axisLabel: {
show: true,
color: color,
interval: 0
},
axisLine: {
show: true,
lineStyle: {
color: color
}
},
data: ${tagNameArrJson}
},
yAxis: {
name: '文章篇数',
type: 'value',
splitLine: {
show: false
},
nameTextStyle: {
color: color
},
axisTick: {
show: false
},
axisLabel: {
show: true,
color: color
},
axisLine: {
show: true,
lineStyle: {
color: color
}
}
},
series: [{
name: '文章篇数',
type: 'bar',
data: ${tagArrJson},
itemStyle: {
borderRadius: [5, 5, 0, 0],
color: new echarts.graphic.LinearGradient(0, 0, 0, 1, [{
offset: 0,
color: 'rgba(128, 255, 165)'
},
{
offset: 1,
color: 'rgba(1, 191, 236)'
}])
},
emphasis: {
itemStyle: {
color: new echarts.graphic.LinearGradient(0, 0, 0, 1, [{
offset: 0,
color: 'rgba(128, 255, 195)'
},
{
offset: 1,
color: 'rgba(1, 211, 255)'
}])
}
},
markLine: {
data: [{
name: '平均值',
type: 'average',
label: {
color: color
}
}]
}
}]
};
tagsChart.setOption(tagsOption);
window.addEventListener('resize', () => {
tagsChart.resize();
});
tagsChart.on('click', 'series', (event) => {
if(event.data.path) window.location.href = '/' + event.data.path;
});
</script>`
}
function categoriesChart (dataParent) {
const categoryArr = []
let categoryParentFlag = false
hexo.locals.get('categories').map(function (category) {
if (category.parent) categoryParentFlag = true
categoryArr.push({
name: category.name,
value: category.length,
path: category.path,
id: category._id,
parentId: category.parent || '0'
})
})
categoryParentFlag = categoryParentFlag && dataParent === 'true'
categoryArr.sort((a, b) => { return b.value - a.value })
function translateListToTree (data, parent) {
let tree = []
let temp
data.forEach((item, index) => {
if (data[index].parentId == parent) {
let obj = data[index];
temp = translateListToTree(data, data[index].id);
if (temp.length > 0) {
obj.children = temp
}
if (tree.indexOf())
tree.push(obj)
}
})
return tree
}
const categoryNameJson = JSON.stringify(categoryArr.map(function (category) { return category.name }))
const categoryArrJson = JSON.stringify(categoryArr)
const categoryArrParentJson = JSON.stringify(translateListToTree(categoryArr, '0'))
return `
<script id="categoriesChart">
var color = document.documentElement.getAttribute('data-theme') === 'light' ? '#4c4948' : 'rgba(255,255,255,0.7)'
var categoriesChart = echarts.init(document.getElementById('categories-chart'), 'light');
var categoryParentFlag = ${categoryParentFlag}
var categoriesOption = {
title: {
text: '文章分类统计图',
x: 'center',
textStyle: {
color: color
}
},
legend: {
top: 'bottom',
data: ${categoryNameJson},
textStyle: {
color: color
}
},
tooltip: {
trigger: 'item'
},
series: []
};
categoriesOption.series.push(
categoryParentFlag ?
{
nodeClick :false,
name: '文章篇数',
type: 'sunburst',
radius: ['15%', '90%'],
center: ['50%', '55%'],
sort: 'desc',
data: ${categoryArrParentJson},
itemStyle: {
borderColor: '#fff',
borderWidth: 2,
emphasis: {
focus: 'ancestor',
shadowBlur: 10,
shadowOffsetX: 0,
shadowColor: 'rgba(255, 255, 255, 0.5)'
}
}
}
:
{
name: '文章篇数',
type: 'pie',
radius: [30, 80],
roseType: 'area',
label: {
color: color,
formatter: '{b} : {c} ({d}%)'
},
data: ${categoryArrJson},
itemStyle: {
emphasis: {
shadowBlur: 10,
shadowOffsetX: 0,
shadowColor: 'rgba(255, 255, 255, 0.5)'
}
}
}
)
categoriesChart.setOption(categoriesOption);
window.addEventListener('resize', () => {
categoriesChart.resize();
});
categoriesChart.on('click', 'series', (event) => {
if(event.data.path) window.location.href = '/' + event.data.path;
});
</script>`
}更多统计图的自定义属性可以查看 ECharts 配置项文档,根据自行喜好对 ECharts 统计图进行修改。
使用统计图
在上文新建的
[Blogroot]\source\charts\index.md文件中添加以下内容:1
2
3
4
5
6<!-- 文章发布时间统计图 -->
<div id="posts-chart" data-start="2021-01" style="border-radius: 8px; height: 300px; padding: 10px;"></div>
<!-- 文章标签统计图 -->
<div id="tags-chart" data-length="10" style="border-radius: 8px; height: 300px; padding: 10px;"></div>
<!-- 文章分类统计图 -->
<div id="categories-chart" data-parent="false" style="border-radius: 8px; height: 300px; padding: 10px;"></div>当然也可以在其他页面引入文章统计图,如果出现图表显示不全的现象可以修改
div的height属性。。posts-chart的data-start="2021-01"属性表示文章发布时间统计图仅显示2021-01及以后的文章数据。tags-chart的data-length="10"属性表示仅显示排名前10的标签。categories-chart的data-parent="true"属性表示有子分类时以旭日图显示分类,其他无子分类或设置为false或不设置该属性或设置为其他非true属性情况都以饼状图显示分类。
具体效果如下图所示:
在时间轴页面使用统计图
[Blogroot]\themes\butterfly\layout\archive.pug1
2
3#archive
+ <div id="posts-chart" data-start="2021-01" style="height: 300px; padding: 10px;"></div>
.article-sort-title= `${_p('page.articles')} - ${getArchiveLength()}`或者写成 pug 文件语法
#posts-chart(data-start="2021-01" style="height: 300px; padding: 10px;")。在分类页面使用统计图
总分类页
/categories,在[Blogroot]\themes\butterfly\layout\includes\page\categories.pug添加:1
2.category-lists!= list_categories()
+ <div id="categories-chart" data-parent="false" style="height: 300px; padding: 10px;"></div>各分类页
/categories/[分类],在[Blogroot]\themes\butterfly\layout\category.pug添加:1
2
3
4
5
6
7
8
9
10
11
12extends includes/layout.pug
block content
if theme.category_ui == 'index'
include ./includes/mixins/post-ui.pug
#recent-posts.recent-posts.category_ui
+postUI
include includes/pagination.pug
else
include ./includes/mixins/article-sort.pug
#category
+ #categories-chart(data-parent="false" style="height: 300px; padding: 10px;")或者写成 pug 文件语法
#categories-chart(data-parent="false" style="height: 300px; padding: 10px;")。在标签页使用统计图
总标签页
/tags,在[Blogroot]\themes\butterfly\layout\includes\page\tags.pug添加:1
2
3.tag-cloud-list.is-center
!=cloudTags({source: site.tags, orderby: page.orderby || 'random', order: page.order || 1, minfontsize: 1.2, maxfontsize: 2.1, limit: 0, unit: 'em'})
+ <div id="tags-chart" data-length="10" style="height: 300px; padding: 10px;"></div>各标签页
/tags/[标签],在[Blogroot]\themes\butterfly\layout\tag.pug添加:1
2
3
4
5
6
7
8
9
10
11
12extends includes/layout.pug
block content
if theme.tag_ui == 'index'
include ./includes/mixins/post-ui.pug
#recent-posts.recent-posts
+postUI
include includes/pagination.pug
else
include ./includes/mixins/article-sort.pug
#tag
+ <div id="tags-chart" data-length="10" style="height: 300px; padding: 10px;"></div>或者写成 pug 文件语法
#tags-chart(data-length="10" style="height: 300px; padding: 10px;")。时间轴页图片放大
在自定义的
custom.js中加入1
2
3
4
5
6
7
8/*------ 归档页图片放大 -------*/
.article-sort-item-img {
overflow: hidden;
width: 120px;
height: 120px;
border-radius: 12px;
}
/*----- 归档页图片放大end -----*/将分类页面的 ul 的 li 变为横向,
[BlogRoot]\themes\butterfly\source\css\_page\categories.styl中加入1
2
3
4
5
6
7
8ul
padding-left: 4px
+ list-style-type: none;
li
- // position: relative
+ display: inline-block;
margin: 6px 0